• Choosing a manufacturing partner for large-volume production is a critical business decision that impacts your quality, supply chain, and bottom line. Clarwe is built for scale, offering a unique blend of engineering expertise, rigorous quality control, and supply chain resilience that sets us apart.
• We don't just manufacture parts; we become an extension of your team, ensuring your product vision is executed flawlessly from the 10,000th to the 1,000,000th unit.
Forget algorithmic quotes and outsourced customer service. Your project is managed by a dedicated engineering team that owns your production lifecycle from design analysis to final delivery. This ensures precise communication, rapid problem-solving, and zero finger-pointing.
Maintaining precision across large production runs is our specialty. Our in-house quality labs with CMM and advanced metrology equipment enforce tolerances as tight as ±0.015mm, achieving industry-leading 99.4% yield rates and eliminating costly waste and rework.
Scale your production from prototype to 250,000+ units without changing partners or compromising on process integrity. Our dynamic manufacturing network and proven workflows allow for rapid ramp-ups, getting your products to market faster and more reliably.
Mitigate risk with our strategically located global partners in FTA (Free Trade Agreement) countries. We optimize logistics and leverage tariff advantages to reduce your total landed cost by up to 30% while guaranteeing disruption-resistant production.
Stay in complete control with our client portal featuring live production dashboards. Receive real-time updates, access inspection reports, and track every order’s status, transforming traditional manufacturing opacity into clarity and confidence.
Scaling from prototype to high-volume production requires a meticulous, transparent, and controlled process. At Clarwe, our engineer-led framework is designed to de-risk large-order manufacturing, ensuring flawless execution from your first unit to your millionth. We don't just take your order; we manage a seamless, integrated workflow built on precision, communication, and absolute accountability, guaranteeing on-time delivery of parts that meet your strictest quality standards.
Our process begins with a deep dive into your design and business goals. Your dedicated engineering team conducts a comprehensive Design for Manufacturability (DFM) analysis, identifying opportunities to optimize for cost, performance, and scale. We establish clear timelines, key milestones, and quality benchmarks, ensuring everyone is aligned before production begins.
Leveraging our global network of pre-vetted manufacturing partners, we strategically select the optimal production facility for your project. We don't outsource and hope for the best; we match your order based on specialized capabilities, available capacity, geographic advantages for tariff optimization, and a proven track record with your specific material and process.
With planning complete, we initiate production with rigorous oversight. You retain complete visibility through our client dashboard, which provides real-time updates on production status. Our on-site quality engineers conduct initial first-article inspections and in-process checks, proactively addressing any deviations to keep your project on schedule and within spec.
Every unit undergoes a stringent quality protocol that includes statistical process control (SPC) during production and final comprehensive inspections using CMMs, laser scanners, and other advanced metrology equipment. You receive detailed documentation, including First Article Inspection Reports (FAIR) and Certificates of Conformance (CoC), providing a complete quality pedigree.
We handle the entire logistics chain to ensure secure and timely delivery. Our team manages everything from customs clearance and tariff classification to final-mile shipping with vetted carriers. We provide full traceability from our floor to your door, ensuring your large-volume order arrives on schedule, intact, and ready for immediate assembly.
Vertically Controlled from Material Receipt to Final Inspection.
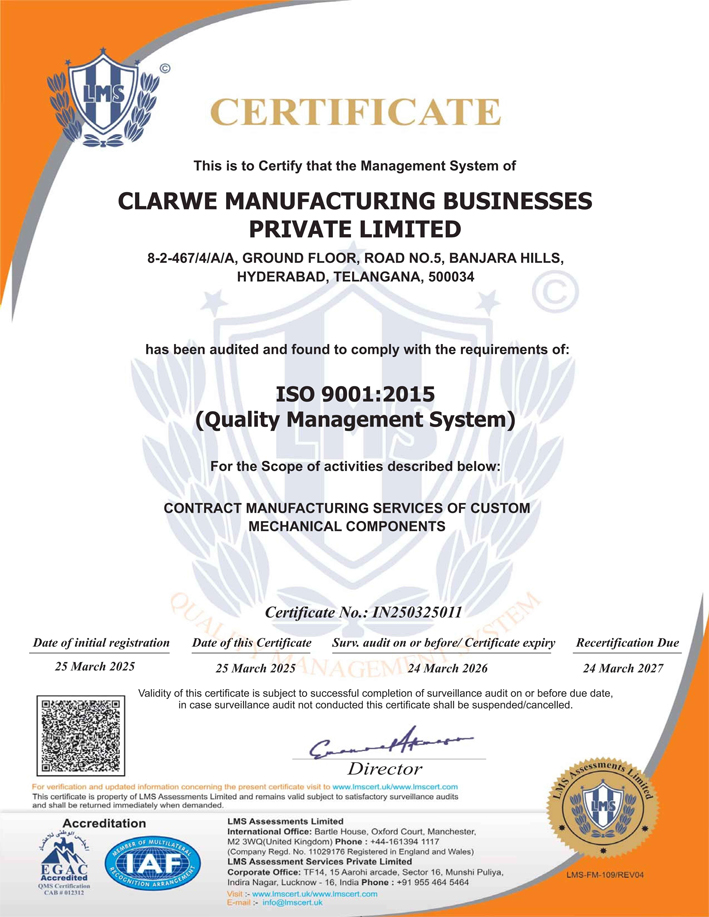
Our QMS certification (Scope: Contract Manufacturing of Custom Mechanical Components)
isn't just a plaque - it's your guarantee of systematic precision. Every workflow follows
audited procedures proven to eliminate supply chain risks.
How Our Certification Protects Your Projects:
Documented Process Control: Standardized work instructions for CNC machining,
inspection, and material handling
Full Traceability: Digital traveler system tracking each component from material
certs to final CMM report
Preventive Maintenance: Calibrated equipment logs (Zeiss CMM, Keyence scanners)
ensuring ±0.0005" measurement accuracy
Closed-Loop Corrective Action Real-time SPC data triggers automatic process
adjustments
"Unlike platform-based manufacturers, our vertically integrated QMS means zero quality handoffs. Your parts never leave our controlled environment - eliminating 97% of traceability gaps common in outsourced models."


Ironclad IP protection: Automatic NDAs enforce confidentiality before project initiation and remain enforced for min 5 years.
Certified precision: ISO 9001/AS9100 quality systems ensure full compliance from design to delivery.
Zero-surprise validation: Every part undergoes pre-shipment inspection with documented reports.
Secure supplier vetting: Your designs remain confidential through anonymized drawings.
• Cosmetic inspection per ASME B46.1 (scratches, burrs, finish)
• Dimensional verification with hand tools (±0.005mm)
• GD&T validation via Zeiss CONTURA CMM
• 3D scan comparisons (Keyence VR-5000)
• Surface profile analysis per ISO 1302
• AS9102-compliant FAIR packages
• PPAP Level 3 submissions
• Full dimensional data sets with deviation heatmaps
• Mill test reports with heat/lot traceability
• RoHS/REACH compliance certification
• Material composition spectroscopy
• CT scanning for internal defects (ISO 17635)
• Liquid penetrant testing (ASTM E165)
• Ultrasonic thickness mapping
• Customer specific documentation packages
• Integration with customer ERP systems
• Lot-specific DHR packages
At Clarwe, our rigorous process control and in-house inspections are designed to make quality concerns a rare exception. However, should a process ever deviate from your specifications, our response will be swift, structured, and guaranteed.
We stand behind every part with a 30-Day Quality Guarantee. If any item does not meet the agreed-upon specifications, we will not only diagnose the root cause at zero cost to you but also expedite a full rework or replacement of the entire order. Our dedicated engineering team will provide a detailed Failure Analysis Report (FAR) and implement immediate corrective actions to prevent recurrence.
Your partnership and trust are paramount. Our goal is not just to resolve issues, but to reinforce your confidence in our commitment to precision and accountability.
When a part fails to meet its specifications, our first priority is to correct the issue at no additional cost to you. We initiate an expedited rework process for the entire batch under the following conditions:
Our Rework Process: Upon notification, our quality team will immediately initiate a root cause analysis, provide you with a detailed report, and expedite the reproduction of your order with the highest priority to minimize any project delays.
We believe in complete accountability. In certain scenarios, a full refund may be the most appropriate resolution. This is promptly processed upon confirmation of any of the following conditions:
Our Refund Process: Once approved, our team will process the refund to the original payment method without delay and arrange for the return of any non-conforming parts at our expense.
While we cater to a wide range of quantities, our high-volume production specialty is optimized for orders from 10,000 to 1,000,000+ units. Our processes are engineered for efficiency and cost-effectiveness at this scale, though we welcome inquiries for both smaller and larger batches.
Consistency is guaranteed through our engineer-led oversight and multi-stage inspection protocol. This includes statistical process control (SPC) during manufacturing and 100% final inspection of critical dimensions using CMM and advanced metrology equipment, ensuring we achieve our 99.4% yield rate and maintain tolerances as tight as ±0.015mm.
Absolutely. DFM analysis is a cornerstone of our process. Your dedicated engineering team will provide a comprehensive design review to recommend adjustments that enhance manufacturability, reduce cost, improve quality, and accelerate production timelines without compromising your design intent.
Lead times vary based on part complexity, quantity, and material. However, our optimized supply chain and manufacturing network allow us to offer some of the industry's most competitive lead times. For example, we can often scale to 250,000+ units in as little as 14 days. A formal quote will provide an exact timeline.
We operate with no mandatory MOQ, providing exceptional flexibility. This allows you to start with a pilot run to validate quality before committing to a full high-volume order, de-risking your scaling process.
We offer transparent, volume-based pricing. The price per unit decreases significantly as order quantity increases due to optimized material purchasing, reduced machine setup times, and streamlined workflows. You will see a detailed breakdown of costs in your quote, with no hidden fees.
Your satisfaction is guaranteed by our 30-Day Quality Guarantee. If any part does not meet specifications, we will perform a root cause analysis, expedite a full rework or replacement at our cost, and provide a detailed report. In qualifying cases, a full refund is available.
You retain complete visibility through our customer portal production dashboards. You’ll receive real-time updates on production status, inspection reports, and shipping tracking, ensuring you are never in the dark.
We accept all standard CAD formats (e.g., STEP, SLDPRT, X_T) along with 2D drawings (PDF) that detail critical dimensions, tolerances, and material specifications. For a comprehensive DFM analysis, providing a detailed drawing is highly recommended.